Showing posts with label Tutorials. Show all posts

Thursday, November 26, 2009

Using True Vision to Create 3D DirectX Animation in C# and .NET

Introduction
It has always been a little painful creating 3D animation using Microsoft DirectX... until now.   True Vision 3D has created a nice wrapper around DirectX 9 to simplify the task of doing animation and game development in .NET.  With this well defined game engine, you can get going creating moving objects right away.  This article is based on a tutorial written by the author Fatima Ahmed describing how to use True Vision to create a furnished room.
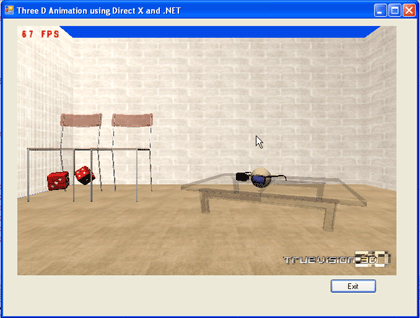
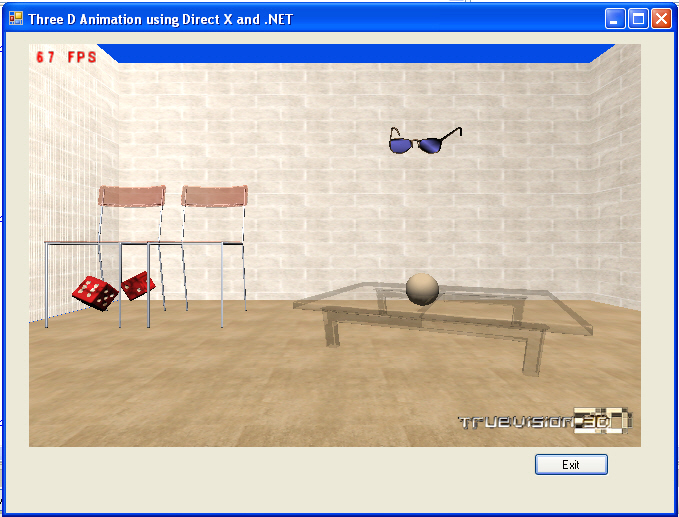
Figure 1 - 3D Animation of Objects using DirectX, True Vision and .NET
Understanding the 3D World
There are a few concepts you will need to understand before tackling the world of 3D animation.  Much of 3D design is based on the concept of meshes.  Meshes are these wire frames described in terms of 3d vectors.  You can think of a mesh as a bent up piece of chicken wire that forms the shape of the desirable object.  A mesh is rendered from its vector components into a solid object using some fancy algorithms handled by Direct X.  In order to give the "chicken wire" a more realistic look,  the wire mesh is covered with a texture.  Textures are simply bitmaps that fill in the polygons in the 3D mesh.  In additions to textures and meshes, the 3D world has the concept of lighting in order to give objects an additional dimension.  Colors in the scene are made lighter or darker to give the illusion of different concentrations of light.  Developers often use programming tools such as 3D Studio, Lightwave 3D, or SoftImage to create meshes, textures, and other aspects of game development.
Thinking in True Vision
The concept behind DirectX (and wrapped nicely by True Vision) is that you create all these meshes as objects in your scene, and rotate, translate, color, or illuminate them separately.   Anotherwords, the steps to animating meshes are this: change the meshes in your scene, render the whole scene.  Then repeat: change the meshes in your scene, render the whole scene.  When do you change the scene?  You can change the scene in response to user input, or in response to a timer, or whatever event in your application is suitable for triggering a change.  
The Program Structure
The application initializes the True Vision Engine at  the time of the load event of the Windows Form.    Inside the load event handler, we create all our mesh objects.  Then we kick off the main loop.  The main loop, which is common to all directx applications, just spins a loop that continously renders the scene filled with meshes.  Rendering is handled in 3 steps:  step 1) clear the previously rendered objects.  step 2) render the new scene in memory 3) display the newly rendered scene on the screen.  These steps continue to loop at a predetermined frame rate.  The loop is exited only after the program sets the loop variable to false.  In our program the loop variable is set to false when the user presses the exit button or closes the form.
Animation
In order to see some interesting animation from our mesh objects, we have to transform them.  We added a routine inside the rendering loop that rotates some of the objects in our scene.  You can rotate any mesh object in the scene that you want using True Vision, but we chose to rotate the dice and the sunglasses.  This strange rotation of objects in the room gives you the illusion that the room is haunted.  To animate, we just add a line inside the rendering loop that calls the method RotateSomeObjects.  This method changes the position of the sunglasses and dice each time through the loop.  At the current frame rate, the dice and sunglasses look like they are spinning.
The Code
Let's take a more detailed look at the code to understand what we talked about so far.  Initialization takes place in the form load event.  The first method, SetupTheInitialScene, sets up the engine, and creates the scene and all the mesh objects.   The Main_Loop call starts the loop and asks the scene to render itself every time through the loop.
Listing 1 - Loading the Scene and starting the Main Loop

private void Form1_Load(object sender, EventArgs e)
        {
            // set up the initial scene
            SetupTheInitialScene();

             // show the form and give it focus
             this.Show();
             this.Focus();

            // start up the main loop, setting the loop guard to ON
             DoLoop = true;
             Main_Loop();
        }
Let's take a look at these two methods. The  SetupTheInitialScene in the form first calls the InitializeTrueVision method in our form which initializes the engine.  Then the SetupTheInitialScene method sets up the lighting and textures to be used by the mesh shapes.  Finally SetupTheInitialScene creates the walls and mesh shapes needed to render the scene as shown in listing 2:
Listing 2 - Setup the scene and create the mesh shapes in the room

 private void SetupTheInitialScene()
{
// initialize true vision details
     InitializeTrueVision();

// create a new scene
 
_scene = new TVScene();

// set the scene background color
  _scene.SetSceneBackGround(0f, 0.3f, 0.9f);

// set the lighting of the scene
  SetupLighting();


// Load Textures
  LoadTextures();

// create wall
  CreateWalls();


//Set the position of the room mesh
  _meshRoom.SetPosition(x_move, y_move, z_move);

// create different shapes in the room
  CreateMeshShapes();
}
The InitializeTrueVision called from SetupTheInitialScene, initializes the true vision engine and sets up texture and mesh path information.  This method also points the engine to render inside the picturebox in our form.  As you can see, initialization of the True Vision framework is pretty sttraightfoward with just a few lines of code.
Listing 3 - Initializes the True Vision Engine

 void InitializeTrueVision()
{
// create a new game engine
TV = new TVEngine();

// set the engine to point the picture box so all rendering will
// occur inside the picture box in the form
TV.Init3DWindowedMode(this.pictureBox1.Handle.ToInt32(), true);

//This is the path where our media (texture and meshes) files are placed
TV.SetSearchDirectory(System.Windows.Forms.Application.ExecutablePath);

// set the rotation angle to be in degrees
TV.SetAngleSystem(CONST_TV_ANGLE.TV_ANGLE_DEGREE);

// We want to see the frames per second
TV.DisplayFPS = true;
}
 
The LoadTextures method called from SetupTheInitialScene brings in all the textures used in the scene as shown in listing 4.  Textures are bitmaps such as jpg or bmp files.  You only need to refer to the texture file's relative path because in Listing 3 we already told the engine what the search path for media would be.  The call which loads the texture assigns a keyword so the texture can be referred to in the code by the keyword.  For example the marble.jpg texture file loaded into the scene is assigned the keyword "marble".
Listing 4 - Loading the Textures into the Scene

 private void LoadTextures()
{
 _scene.LoadTexture("textures\\marble.jpg", -1, -1, "marble");
 _scene.LoadTexture("textures\\cinder.bmp", -1, -1, "wood");
 _scene.LoadTexture("textures\\granite.bmp", -1, -1, "granite");
 _scene.LoadTexture("textures\\metal.bmp", -1, -1, "metal");
 _scene.LoadTexture("textures\\sandstone.bmp", -1, -1, "sandstone");
 _scene.LoadTexture("textures\\oldrock.bmp", -1, -1, "oldrock");
}
 
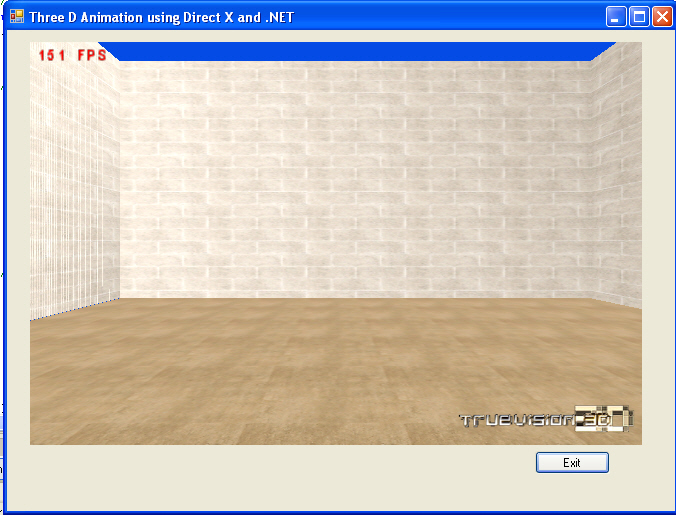
Now that we have our textures, we are ready to create our mesh shapes.  First we will create the room walls.  Lucky for us, the True Vision engine has built-in methods to handle the creating of walls as shown in listing 5.  We simply use the AddWall3D method.  This method takes the texture as its first parameter.  The texture id is looked up through the keyword we assigned in  listing 4.  Our walls are all cinder blocks, so we will bring in the cinder block texture.  The next 4 parameters in the AddWall3D method specify the x and z 3d coordinate positions defining the wall rectangle.  The last two parameters specify the tile dimensions of the texture.  There is a separate call to draw the floor called AddFloor and before you know it we have a room!  Listing 5 shows the calls for creating a mesh room and figure 2 shows the rendered result.  (Note the room isn't actually rendered until the Main_Loop).
Listing 5 - Creating the room walls using the True Vision Engine

 private void CreateWalls()
{ // create a new mesh object and call it "room
_meshRoom = (TVMeshClass)_scene.CreateMeshBuilder("room");
// add the walls to the room
_meshRoom.AddWall3D(global.GetTex("cinder"), 350.0f, -350.0f, -350.0f, -350.0f, 350.0f, 5.0f, true, false, -50.0f, 5.0f, 5.0f);
_meshRoom.AddWall3D(global.GetTex("cinder"), -350.0f, -350.0f, -350.0f, 350.0f, 350.0f, 5.0f, true, false, -50.0f, 5.0f, 5.0f);
_meshRoom.AddWall3D(global.GetTex("cinder"), -350.0f, 350.0f, 350.0f, 350.0f, 350.0f, 5.0f, true, false, -50.0f, 5.0f, 5.0f);
_meshRoom.AddWall3D(global.GetTex("cinder"), 350.0f, 350.0f, 350.0f, -350.0f, 350.0f, 5.0f, true, false, -50.0f, 5.0f, 5.0f);
_meshRoom.AddFloor(global.GetTex("sandstone"), -350.0f, -350 - 0f, 350.0f, 350.0f, -50.0f, 10.0f, 10.0f, true, false);
}

Figure 2 - The Rendered Room
Now let's see how to create all the cool shapes in our room. Listing 6 creates all the shapes in our room: 2 chairs, 2 dice, a table, a sphere, and a pair of sunglasses.
Listing 6 - Creating the interesting mesh shapes inside the Room

 private void CreateMeshShapes()
{
// create a table with a transparent tabletop
CreateMeshTable();

// create a chair
CreateChair1();

// create another chair
CreateChair2();

// create dice
CreateDie1();
CreateDie2();

// create sunglasses and place them on the table by adjusting the position
CreateSunglasses();

// create a sphere inside the sunglasses
CreateSphere();
}
 
 In order to create a shape, we just need to load an existing mesh object from a file,  perhaps give it a texture, and set its position in the room.  The mesh file format for direct x is the x file format (sounds a bit like  TV show).  The extension of this format is .x and is used for creating games for the X-Box and other DirectX applications.  True Vision also excepts the 3d studio (3ds)  format, but our example uses X meshes.  Let's see how we create a mesh object for the table.  First we create a mesh object, this can be done directly from the scene the CreateMeshBuilder method.  Next we load the X file from our meshes directory and place it at the desired x,y,z coordinates in the room (using SetPosition).  We want to size and rearrange the table a bit, so we scale it by a factor of 3 and turn it 25 degrees.  Finally we apply the sandstone texture to the table by calling SetTexture as in Listing 7.
Listing 7 - Creating the mesh table, size it, rotate it, and apply a texture

        private void CreateMeshTable()
        {

            // create a mesh object called table
            _meshTable = (TVMeshClass)_scene.CreateMeshBuilder("table");

            // load the object from an x file
            _meshTable.LoadXFile(@"meshes\glasstable.x", true, true);

            // set its position
            _meshTable.SetPosition(80.0f, -50.0f, 340.0f); 

            // make the table 3x larger
            _meshTable.ScaleMesh(3, 3, 3);

            // rotate it 25 degrees around the Y 3D Axis
            _meshTable.RotateY(25, true);

            // set the tables texture to sandstone
            _meshTable.SetTexture(global.GetTex("sandstone"), -1);
        }


All mesh objects are created in a similar way.  They are just loaded from there corresponding x files.  For example, the sunglasses are from the sunglass.x file and placed on top of the table by putting them in the same position as the table.
Listing 8 - Creates the Sunglasses to be Rendered

        private void CreateSunglasses()
        {
            _sunglasses =
            (TVMeshClass)_scene.CreateMeshBuilder("sunglasses");

            _sunglasses.LoadXFile(@"meshes\sunglass.x", true, true);
          // place glasses in the same place as the table,
         // and it will appear

        // as if they are resting on top of the table

            _sunglasses.SetPosition(80f, -40.0f, 310.0f);
            _sunglasses.RotateY(25, true);
            _sunglasses.ScaleMesh(15, 15, 15);
        }

When you are creating these scenes, you'll find you might need to play around with the coordinates and mesh sizes to get the scene the way you want it.  For example, placing the sunglasses at a different y coordinate makes it look like the sunglasses are floating above the table.  Another words, changing SetPosition to

            _sunglasses.SetPosition(80f, 100.0f, 310.0f);
Renders the scene shown below:

Figure 3 - Changing the y Coordinate Position of the Sun Glasses
The Main Loop
The main loop consists  of a simple loop that just continually renders the scene until the guard condition (DoLoop) is set to false .  It is in this loop that you can capture input from the user, check for collisions between objects,  implement state machines, and animate objects.  In our application we have inserted the call RotateSomeObjects into our main loop to make things slightly interesting by animating some of the mesh objects on the screen.
Listing 9 - The Main Loop that Renders the Mesh objects each time through the loop to Produce the Scene

private void Main_Loop()
        {
            int fps;
            // We loop through all of this over and over until the DoLoop isn't True.
            while (DoLoop == true)
            {
               // allow normal window events to take place
                System.Windows.Forms.Application.DoEvents();


           // for games, we would add input and movement checks here
          //      CheckInput();
         //       CheckMovement();

          //Get the Frame per Second
                fps = (int)TV.GetFPS();

                // rendering is started by clearing the image
                TV.Clear(false);


                // rotate some of the objects set up in the form load
                RotateSomeObjects();
 

               // render all the mesh objects inside the scene in memory
                _scene.RenderAllMeshes(true);
                // display the rendered objects on the screen
                TV.RenderToScreen();
            }


            // We ask to quit.
            Main_Quit();
        }

RotateSomeObjects rotates the dice and the glasses.  One dice appears to rotate along  its length, while the other appears to rotate along its vertices.  The sunglasses look as though they are rotating around the sphere.
Listing 10 - Animating some of the Mesh Objects

        private void RotateSomeObjects()
        {
            // rotate first die around the X Axis 5 more degrees
            _die1.RotateX(5, true);

             // rotate second die around the X Axis and Z Axis
            _die2.RotateX(5, true);
            _die2.RotateZ(5, true);

             // rotate the sunglasses around the Y Axis
            _sunglasses.RotateY(5, true);
        }

Dealing with Input
Perhaps we want to allow the user to stop the sunglasses or die from rotating.  To do this, we need to get user input.  We can use the True Vision TVInputEngine object to get input from the keyboard or the mouse in order to control the rendering on the screen.  As an example, let's allow the user to stop the sunglasses from spinning if the user types 'S' and stop the dice from spinning if the user types 'D'.  If the user types 'R', the dice and the sunglasses will both start spinning again.  If we uncomment CheckInput from the main loop we can check the user input each cycle through the loop.  The CheckInput method would use the Input Method to set flags that will control rendering as shown in listing 11.
Listing 11 - Check the Input and Set the Flags that Control the Rendering in RotateSomeObjects

       TVInputEngine InputEngine = new TVInputEngine();  // constructs the input engine
       private void CheckInput()
        {
            // check if we want to stop the sunglasses
            if (InputEngine.IsKeyPressed(CONST_TV_KEY.TV_KEY_S))            
                  _rotateGlasses = false// stop the glasses

            // check if we want to stop the die
            if (InputEngine.IsKeyPressed(CONST_TV_KEY.TV_KEY_D))
                _rotateDie = false; // stop the die

            if (InputEngine.IsKeyPressed(CONST_TV_KEY.TV_KEY_R))
            {
                // restart both glasses and die

                _rotateGlasses = true;
                _rotateDie = true;
            }

        }
Now we just need to slightly alter the RotateSomeObjects method in listing 10 to respond to the _rotateGlasses and _rotateDie flags.
Listing 12 - The Altered RotateSomeObjects Method that Rotate Objects according to Input Settings

         void RotateSomeObjects()
        {
            // rotate first die around the X Axis if die flag is set
            if (_rotateDie)
            {
                _die1.RotateX(5, true);

                // rotate second die around the X Axis and Z Axis
                _die2.RotateX(5, true);
                _die2.RotateZ(5, true);
            } 

            // rotate the sunglasses around the Y Axis if sunglasses flag is set
            if (_rotateGlasses)
            {
                _sunglasses.RotateY(5, true);
            }
        }

Conclusion
DirectX has never been easy to program.  The True Vision library makes a great attempt at simplifying the use of DirectX 9 with a well thought out .NET library.  In this article we have shown you how to use True Vision's engine to create a scene and render it to the screen.  We have given you some insight into how to create 3D animation, and we have shown you how you can take advantage of True Visions Input Engine to control the animation. Hopefully this article will get you started in creating your own great games or creative visions in the world of .NET.

source www.c-sharpcorner.com/UploadFile/mgold/TrueVision02212006001458AM/TrueVision.aspx

Friday, November 20, 2009

Programming games for Nintendo WII part 1

The first thing that you need to start Wii programming is to get the proper development tool. You will need the DevkitPPC witch is the part of the DevkitPro toolchain used for Wii and Gamecube development. These guides describe setting up such a system.

Installing devkitPPC forWindows

  • Go to this page and download the latest Windows installer.
  • Let it install to the C:\devkitPro\ to make it easier to follow the tutorial for now.
  • When installing it, you can deselect devkitARM and devkitPSP
  • Click next until it finishes installing

Setup your project folder

  • Under no circumstances should you place projects within the devkitPro folder. The windows updater can and will overwrite/delete your files.
  • Create a new folder outside the devkitPro folder, c:\projects\wii for example. This path should not contain spaces.
  • Copy the folder C:\devkitPro\examples\wii\template\ to this new directory and rename it to "helloworld" so that the full path is c:\projects\wii\helloworld\

Compile the Hello World Example

  • Assuming you installed Programmer's Notepad through the installer, double click the .pnproj file in your new project.
  • Click on Tools->make or use the ALT+1 key combination
  • The output window at the bottom will show the build progress
Note: If you are having trouble compiling some programs under Windows Vista (eg. libogc cvs), try unsetting PLATFORM variable. (in msys shell, "unset PLATFORM")

Run the Hello World Example on the emulator

  • Now, browse to the helloworld folder. There should be a helloworld.dol file here now.
  • Run the hellworld.dol in an emulator. As of 31-Mar-2009, emulators for the Wii are not 100% compatible and feature complete. Dolphin can successfully run some homebrew. See the Dolphin page for more information. Another emulator is Gcube. Gcube does not run homebrew compiled in Wii mode, but can run homebrew if compiled for the GameCube mode. See the Gcube page for more information.

Run the Hello World Example on the Wii using wiiload

  • For this to work, you need to have the Homebrew Channel installed on your Wii and a way to access the Wii via TCP.
  • Get wiiload.exe from the Homebrew Channel archive (should be in wiiload\win32) and copy it to C:\devkitPro\msys\bin.
  • Set the environment variable WIILOAD to something like "tcp:192.168.0.30" (replace the IP with your Wii's IP). This can be done via Control Panel -> System -> Advanced -> Environment Variables. Then restart windows.
  • Start the Homebrew Channel on your Wii.
  • Click on Tools -> run or use the ALT+R key combination.
  • The output window at the bottom will show the upload progress (so does the Homebrew Channel) and the example will be started on your Wii when it's done. 

Installing devkitPPC for Linux

Installing through the repositories

It may be possible to install devkitPPC via your linux distro repositories. Try searching for devkitPPC MYDISTRO [1].
If you are using Ubuntu or Debian, there is a repository with .deb files maintained by UCLM university.
1. Add to sources.list file the lines
deb http://arco.esi.uclm.es/~francisco.moya/debian ./
deb http://arco.esi.uclm.es/~francisco.moya/debian-amd64 ./
deb-src http://arco.esi.uclm.es/~francisco.moya/debian ./
2. Execute sudo apt-get update
3. Execute sudo apt-get install devkitpro-ppc
The files will be installed at /opt/devkitPro with read-only permission. You can do a copy of the examples directory in your user space and then compile and run in the normal way.
cp -r /opt/devkitPro/examples/ .
cd examples/wii/template
make
make run

Installing devkitPPC from DevkitPro packages

A premade archive of these files (organized according to the directory structure below) is available here
Note: The US mirror for DevkitPPC can be slow, so you might have to switch to a European one.
Note: Extract the files from the devkitPPC tarball using "tar -xvjf " to preserve symlinks, etc...
  • Create a folder for devkitpro and extract everything into it such that you have this directory structure:
devkitpro
  devkitPPC
  wii-examples
  libogc (extract the libfat tar under this directory as well)
  • Edit ~/.bashrc and add
export DEVKITPRO=/path/to/devkitpro # replace this by your actual path
export DEVKITPPC=$DEVKITPRO/devkitPPC
PATH=$PATH:$DEVKITPPC/bin
  • Optionally, find out your Wii's IP with the homebrew channel and add
export WIILOAD=tcp:192.168.1.5 # replace this by your Wii's IP
  • Restart your terminal or type
source ~/.bashrc

Compiling a Hello World

  • Enter devkitpro/wii-examples/template and simply type
make
  • To run the example on your Wii, start the homebrew channel and type
make run
Voilà! You just compiled your first Wii program!

Compiling Insight Debugger

A custom version of the Insight graphical debugger is included as part of the DevkitPro package, however currently there are no linux binaries available. In order to successfully compile the source under linux, you need to run the following sequence of commands from the directory where you unpacked the source:
for f in `find`; do dos2unix ${f}; done
./configure --target=powerpc-gekko
make
make install prefix=/directory/to/install/to

Using DDD (GNU Data Display Debugger)

An alternative to Insight is DDD
It has the advantage that you won't have to compile it on linux
For instance to install it on ubuntu just use the following command:
sudo apt-get install ddd
Then you use ddd with powerpc-gecko-gdb with the following:
ddd --debugger path-to-powerpc-gecko-gdb
And finally you can use the console at the bottom to connect to your wii and load the symbols as you would using gdb from the console
For instructions on how to use gdb or insight for remote debugging, see Remote Debugging with GDB

Installing devkitPPC for Mac OS X


  • First make sure you have Xcode tools 3 (note that this requires Leopard) or above installed then go here and download the latest Mac distro (actually we don't have the latest release as pkg. Try the higher release with a pkg. If you see the latest release with a pkg, please remove this). Also download gcube emulator for mac.
  • Double-click the devkitPPC.pkg and follow the set-up instructions then log out and back in or restart.

Compile the Hello World Example

  • Launch Xcode
  • Select "New project..." from the File menu
  • Select "devkitPPC Wii Project"
  • Name your project, and pick a place to save it
  • Hit "Build"
  • The completed .dol file will (by default) be found in build/Development

Run the Hello World Example

  • To run the file again open Terminal and type “gcube ~/Desktop/WiiBrew/devkitPPC\GameCube\Project/build/Development/devkitPPC” no quotes obviously.
  • The resulting dol should be compatible with the Twilight Hack. Unfortunately dols compiled with CVS libogc and future stable releases will not be compatible with Gcube.

Some Code snippets

libogc provides a jump back to the loader through the standard libc exit function. exit(0) will immediately return, all other values will display a console screen with the exit code.
  • Add this in your main while loop, under "VIDEO_WaitVSync()":
PAD_ScanPads();
int buttonsDown = PAD_ButtonsHeld(0);
if( (buttonsDown & PAD_TRIGGER_Z) && (buttonsDown & PAD_BUTTON_START)) {
  exit(0);
}
 
source wiibrew.org/wiki/Devkitppc_setup

Friday, November 13, 2009

NVIDIA GPU Programming Guide


I have read a great chapter about programming gpu's of nvidia video cards  that the company gives on line for free and you can find it here
http://developer.nvidia.com/object/gpu_programming_guide.html

It is very usefull if you want to improve the performance of your code and you can find tips about using your gpu for general purpose computation

Sunday, November 8, 2009

Programming the pong game with Java

The game has only two class. One JFrame to show the game window and one JPane to render the Graphics

import javax.swing.*;
import java.awt.*;
import java.awt.event.*;

public class MainWin extends JFrame {

    private JPanel jContentPane = null;
   
    private GamePanel panel = null; // This is the panel of the game class
   
    private GamePanel getPanel() {
        if (panel == null) {
            panel = new GamePanel(); // The panel is created
        }
        return panel;
    }

    /**
     * This is the default constructor
     */
    public Main() {
        super();
        initialize();
        this.addKeyListener(new KeyAdapter() {
            public void keyPressed(KeyEvent evt) {
                formKeyPressed(evt);
            }
            public void keyReleased(KeyEvent evt) {
                formKeyReleased(evt);
            }
        });
       
    }
   
    private void formKeyPressed(KeyEvent evt)
    {
        panel.keyPressed(evt);
    }
    private void formKeyReleased(KeyEvent evt)
    {
        panel.keyReleased(evt);
    }

    private void initialize() {
        this.setResizable(false);
        this.setBounds(new Rectangle(312, 184, 250, 250)); // Position on the desktop
        this.setMinimumSize(new Dimension(250, 250));
        this.setMaximumSize(new Dimension(250, 250));
        this.setContentPane(getJContentPane());
        this.setTitle("Pong");
    }
    private JPanel getJContentPane() {
        if (jContentPane == null) {
            jContentPane = new JPanel();
            jContentPane.setLayout(new BorderLayout());
            jContentPane.add(getPanel(), BorderLayout.CENTER);
        }
        return jContentPane;
    }
   
    public static void main(String[] args) {
        SwingUtilities.invokeLater(new Runnable() {
            public void run() {
                Main thisClass = new Main();
                thisClass.setDefaultCloseOperation(JFrame.EXIT_ON_CLOSE);
                thisClass.setVisible(true);
            }
        });
    }
}
 The second class contains the code for the game logic and the game rendering
import java.awt.*;
import java.awt.event.KeyEvent;
import javax.swing.*;


public class GamePanel extends JPanel implements Runnable {
   
    private static final long serialVersionUID = 1L;
        // Positions on X and Y for the ball, player 1 and player 2
    private int pelotaX = 10, pelotaY = 100, jug1X=10, jug1Y=100, jug2X=230, jug2Y=100;
    Thread hilo;
    int derecha=5; // to the right
    int izquierda= -5; //to the left
    int arriba=5; // upward
    int abajo= -5; // down
    int ancho, alto; // Width and height of the ball
    // Scores
    int contPlay1=0, contPlay2=0;
    boolean player1FlagArr,player1FlagAba, player2FlagArr, player2FlagAba;
    boolean juego, gameOver;
   
    public GamePanel(){
        juego=true;
        hilo=new Thread(this);
        hilo.start();
    }
   
    // Draw ball and ships
    public void paintComponent(Graphics gc){
        setOpaque(false);
        super.paintComponent(gc);
       
        // Draw ball
        gc.setColor(Color.black);
        gc.fillOval(pelotaX, pelotaY, 8,8);
       
        // Draw ships
        gc.fillRect(jug1X, jug1Y, 10, 25);
        gc.fillRect(jug2X, jug2Y, 10, 25);
       
        //Draw scores
        gc.drawString("Jugador1: "+contPlay1, 25, 10);
        gc.drawString("Jugador2: "+contPlay2, 150, 10);
       
        if(gameOver)
            gc.drawString("Game Over", 100, 125);
    }
   
    // Positions on X and Y for the ball
    public void dibujarPelota (int nx, int ny)
    {
        pelotaX= nx;
        pelotaY= ny;
        this.ancho=this.getWidth();
        this.alto=this.getHeight();
        repaint();
    }
   
    // Here we receive from the game container class the key pressed
    public void keyPressed(KeyEvent evt)
    {
        switch(evt.getKeyCode())
        {
            // Move ship 1
            case KeyEvent.VK_W :
                player1FlagArr = true;
                break;
            case KeyEvent.VK_S :
                player1FlagAba = true;
                break;
                       
            // Move ship 2
            case KeyEvent.VK_UP:
                player2FlagArr=true;
                break;
           case KeyEvent.VK_DOWN:
               player2FlagAba=true;
                break;
        }
    }
   
    //    Here we receive from the game container class the key released
    public void keyReleased(KeyEvent evt)
    {
        switch(evt.getKeyCode())
        {
            // Mover Nave1
            case KeyEvent.VK_W :
                player1FlagArr = false;
                break;
            case KeyEvent.VK_S :
                player1FlagAba = false;
                break;
                       
            // Mover nave 2
            case KeyEvent.VK_UP:
                player2FlagArr=false;
                break;
            case KeyEvent.VK_DOWN:
               player2FlagAba=false;
                break;
        }
    }
   
    // Move player 1
    public void moverPlayer1()
    {
        if (player1FlagArr == true && jug1Y >= 0)
            jug1Y += abajo;
        if (player1FlagAba == true && jug1Y <= (this.getHeight()-25))
            jug1Y += arriba;
        dibujarPlayer1(jug1X, jug1Y);
    }
   
    // Move player 2
    public void moverPlayer2()
    {
        if (player2FlagArr == true && jug2Y >= 0)
            jug2Y += abajo;
        if (player2FlagAba == true && jug2Y <= (this.getHeight()-25))
            jug2Y += arriba;
        dibujarPlayer2(jug2X, jug2Y);
    }
   
    // Position on Y for the player 1
    public void dibujarPlayer1(int x, int y){
        this.jug1X=x;
        this.jug1Y=y;
        repaint();
    }
    // Position on Y for the player 2  
    public void dibujarPlayer2(int x, int y){
        this.jug2X=x;
        this.jug2Y=y;
        repaint();
    }
   
    public void run() {
        // TODO Auto-generated method stub
        boolean izqDer=false;
        boolean arrAba=false;
       
        while(true){
           
            if(juego){
           
            // The ball move from left to right
               if (izqDer)
            {
                // a la derecha
                pelotaX += derecha;
                if (pelotaX >= (ancho - 8))
                    izqDer= false;
            }
            else
            {
                // a la izquierda
                pelotaX += izquierda;
                if ( pelotaX <= 0)
                    izqDer =  true;
            }
              
              
            // The ball moves from up to down
               if (arrAba)
            {
                // hacia arriba
                pelotaY += arriba;
                if (pelotaY >= (alto - 8))
                    arrAba= false;
                   
            }
            else
            {
                // hacia abajo
                pelotaY += abajo;
                if ( pelotaY <= 0)
                    arrAba =  true;
            }
               dibujarPelota(pelotaX, pelotaY);
              
            // Delay
            try
            {
                Thread.sleep(50);
            }
            catch(InterruptedException ex)
            {
               
            }
           
            // Move player 1
            moverPlayer1();
           
            // Move player 2
            moverPlayer2();
           
            // The score of the player 1 increase
            if (pelotaX >= (ancho - 8))
                contPlay1++;
                           
            // The score of the player 2 increase
            if ( pelotaX == 0)
                contPlay2++;
                                       
            // Game over. Here you can change 6 to any value
                        // When the score reach to the value, the game will end
            if(contPlay1==6 || contPlay2==6){
                juego=false;
                gameOver=true;
            }
           
            // The ball stroke with the player 1
            if(pelotaX==jug1X+10 && pelotaY>=jug1Y && pelotaY<=(jug1Y+25))
                izqDer=true;
           
            // The ball stroke with the player 2
            if(pelotaX==(jug2X-5) && pelotaY>=jug2Y && pelotaY<=(jug2Y+25))
                izqDer=false;
            }
        }
    }
   
}

First Person Shooter Game

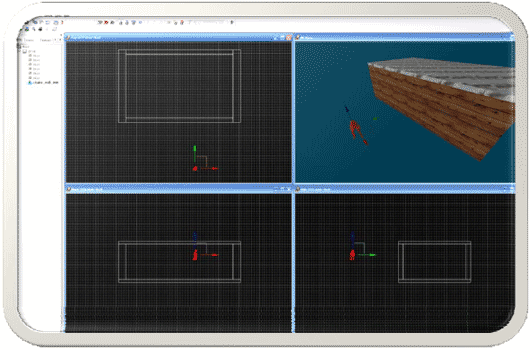
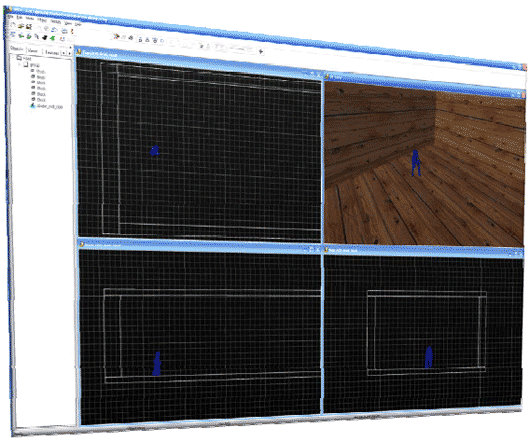
3D game development is an exciting activity for many students. But getting a handle on 3D game development for novices may be a daunting task. We take this opportunity to present a quick introduction to 3D game development through a few tutorials. For the next few columns a set of tutorials for a 3D first person shooter game developed by graduate and undergraduate students under the guidance of a faculty member from the University of West Florida will be presented. These tutorials were developed with 3D game Studio by Conitec. To follow along, download the software from www.conitec.com. These tutorials include all elements of game development such as modeling and animation, lighting, collision detection, sound and scripting. Each tutorial will focus on one or more of these aspects. This week we start out with creating a room and adding some objects to the room. The instructions for this are presented below.


1  IMPORTING A MODEL

Importing a Model is easy and fun! Models can include your character, non-player characters, level objects, weapons, health supplies, etc. To make a working entity in GameStudio, you must first import a 3D model and then assign functions, or behaviors, to the model. These functions give models unique properties. For example; if you import a model of an elf, you can assign player functions to the model that will allow you to control the elf. Likewise, if you import a health pack, the functions you assign to it will make the model act like a health pack. Things can get really crazy if you assign functions to models incorrectly! How funny would it be if you ran into the elf and it healed you while you controlled the movement of a health pack!
  1. First open the WED (World Editor Program), and click Object -> Load Entity

  1. It is very important that your model is saved into GameStudio's "Work folder"
    This folder is usually under
    "C:\Program Files\GStuido6\work"
    – this is the default folder in the popup menu

  1. From here, select your model and Click Open (open "cbabe.mdl" or "warlock.mdl" )

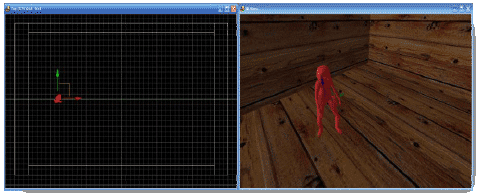
  1. Notice that "cbabe" may be outside of your room. To get her within the room, simply click the Move button (on the toolbar) and drag her into the room. Be sure to examine all windows to make sure that she's properly aligned

  1. Your model is now inserted into your level. Wow! That was easy! You can now continue to move this model wherever you want it in your level. You can resize and rotate it!

2 ASSIGNING A FUNTION/BEHAVIOR

Once you have the model in your level, you probably want it to do something. In order for your model to have some sort of properties, you must assign a function, or Behavior, to the model. To begin with, make sure that you have assigned a script to the game that you are making. The script, which is written in a programming language called C-Script, is what contains all the variables, functions, and other bits of code that will add to making your game awesome!

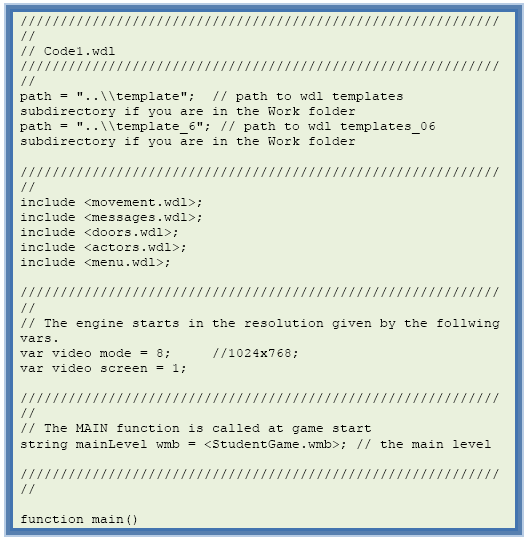
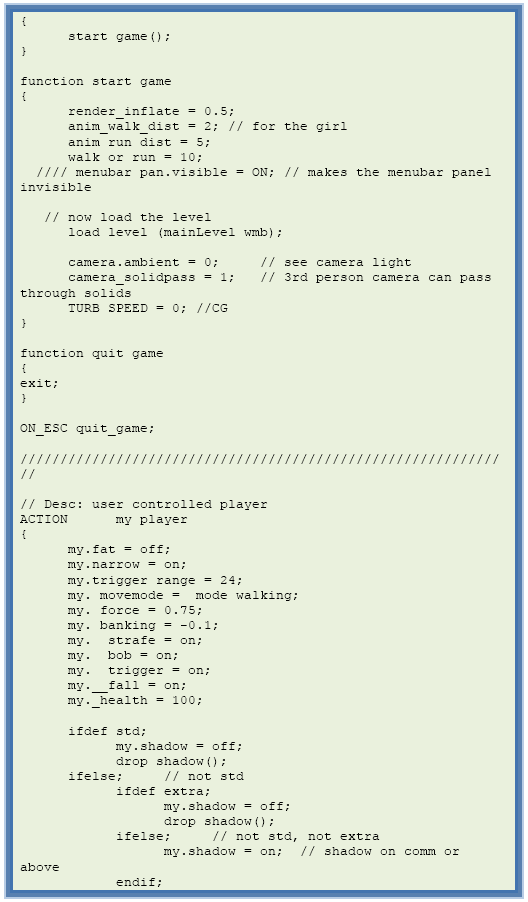
Code1.wdl

Open the SED (Script Editor) and copy & paste this code into it. Save the file as "Code1.wdl" into the work folder (usually under " C:\Program Files\GStuido6\work ")


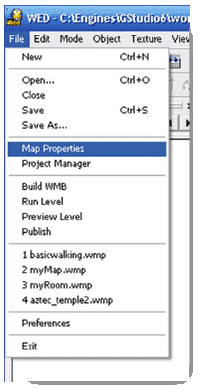
  1. To add a script to your game, click on File à Map Properties

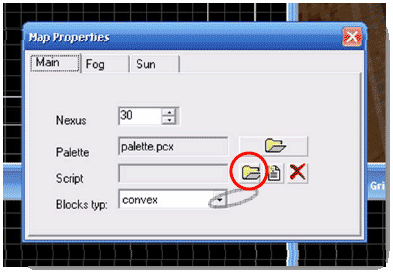
  1. A pop-up menu entitled Map Properties will appear. As you can see in the Script Box, no script has been defined. To do this, click the Folder icon to the right of the Script Box

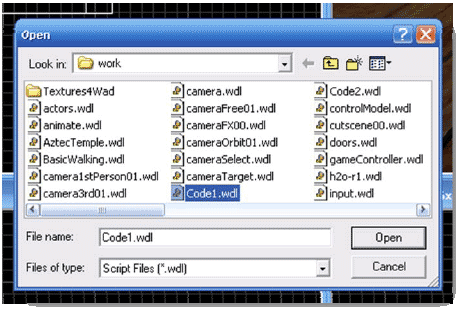
  1. A pop-up menu will open that defaults to the "Work Folder." From here, select the script file (".wdl") that contains the code for your game. We will use "Code1.wdl"

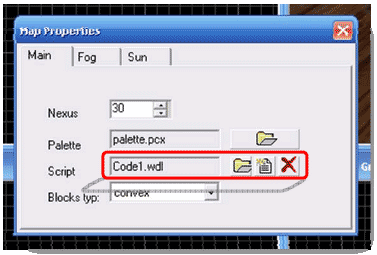
  1. Now you will return to the Map Properties dialog box. As you can see, the script file is now inside the Script Box

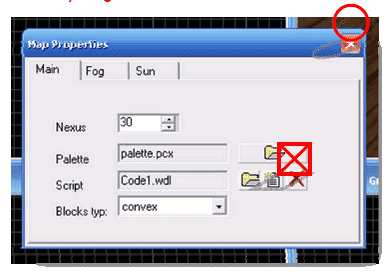
  1. Then close this menu out simply by clicking the close button. Clicking the red X to the right of the Script Box will remove the script you just added to your game

  1. Now select the model that you want to add a Behavior to. When selected, your model will appear in a red wire frame

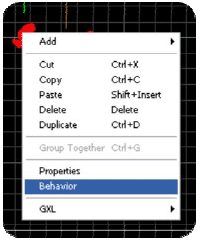
  1. Right-Click the selected model and choose Behavior

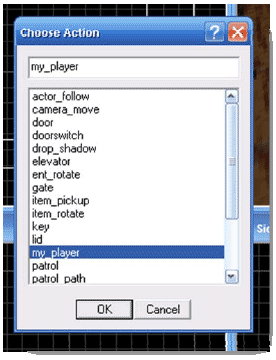
  1. A pop-up menu will appear. In this menu, you can select the Behavior that you want your model to have. The Behaviors are described in your script. For example, if you want your model to be the character that you play as, choose "my_player" for a health pack, choose "health_pack," etc. You can customize any Behavior and even create your own in the script. But for now, simply select "my_player" and press OK

  1. Your model now has the Behavior that you chose for it! See how easy and fun that was? You now should have learned all the basic elements of creating a game. If you want to Build and Run your game, you can do so now!

3  COMPLILING AND RUNNING

In order to test a game out, it needs to be Compiled. Compiling takes all the code, models, and levels that have been put together and converts it into a language that the computer can readily understand: machine language !
Please take note that this doesn't create your executable file. This simply allows you to "run" your game
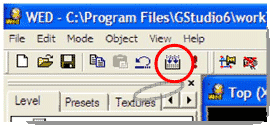
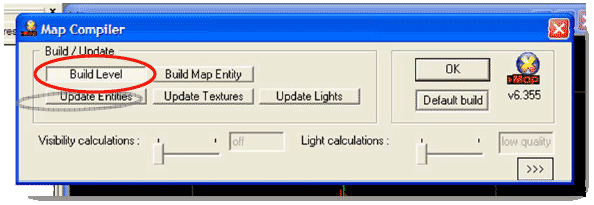
  1. First, Click the Build button

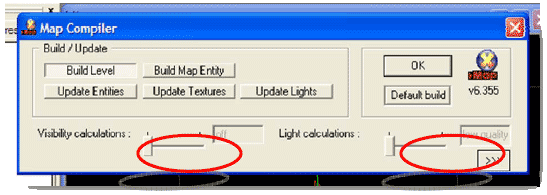
  1. A pop-up menu will appear that lets you adjust what exactly you want to compile or update. If you're just doing a quick test, make sure that your Visibility Calculations and Light Calculations are set to Off and Low Quality. This will dramatically reduce the time it takes to compile your game. You shouldn't be able to see a difference between these settings, and (for productivity purposes) you should wait to turn these on until you have finished tweaking your game

  1. Make sure that the Build Level button is selected and click OK

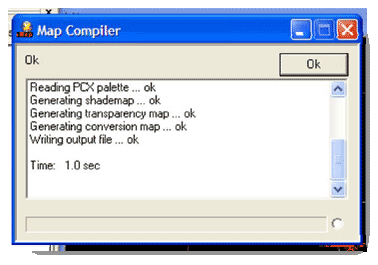
  1. A Map Compiler dialog box will appear and, depending on the complexity of your game, the time it takes to compile your game will vary.

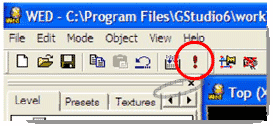
  1. Click the Run button

  1. Click the Ok Button once more in the "Run Level" dialog box

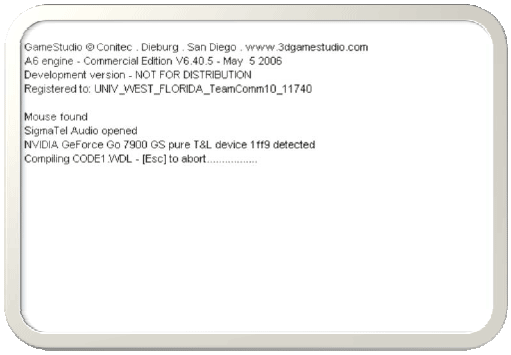
  1. Your game will now start! Now how have some fun!

Congratulations you now have all the basic skills to make your own game using GameStudio! Now begin making your own fun games!

source www.jot.fm/issues/issue_2008_01/column5

Flash MX First Person Shooter Game Tutorial


In this Flash tutorial we shall set out the basics for a First Person Shooter Game (hereafter called an fps).

  • We shall do the basics of attaching the gun sights to the mouse movement and hiding the standard mouse icon,
  • Making bullet holes in the background,
  • creating a gun firing sound,
  • and testing for a hit on a very basic moving target.
Later on, I will write a more complex tutorial to fill in the details.
Flash Tutorials in Video Format - Watch them now at LearnFlash.com  

Create the hit area button for the game

Let's start.

  1. Choose the rectangle tool and drag a rectangle to cover the whole stage.
  2. Select the rectangle and hit key F8 and create a button. Call it "hitArea".
  3. Open the library and double click on the hitArea button.
  4. Go to the first frame and hit key F6 to create 3 more keyFrames.
  5. Delete the first 3 frames of the button and leave the "hit" frame. This is going to be an invisible button and when the mouse is clicked , the gunfire sound will play and a bullet hole will appear in the background.
  6. Select the hitArea button on the main stage and in its properties window, call its instance name "hit1".

Load the gunfire Sound


  1. Find or edit a gunfire sound.
  2. Select menu item "File" - "Import to library" and select the audio file. The audio file will appear in the library.
  3. Right click on the audio file and select "linkage".
  4. Tick the "export for Actionscript" textbox and in the identifier box, write "gunfire".
  5. Lock the frame that the hit button is on and create another layer and call it "code".
  6. Hit the F9 key to open the Actions window. Write this code :
  7. // gunfire sounds
    var gunfire = new Sound();
    gunfire.attachSound("gunfire");
    // When mouse is clicked, start sound 
    _root.hit1.onPress = function() {
     gunfire.start();
    }
    

Create the Gun Sights for the game


  1. Create another layer and call it "sights".
  2. Draw a gun sight however you want.
  3. Select the drawing and press F8 to make a movieclip.
  4. Call it "gun".
  5. With the gun still selected name it "gun" in the instance name texbox in the properties window.
  6. Lock its frame and go to the "code" layer and add this under the code we entered earlier :
  7. // initialise the movie
    _root.onLoad = function() {
     // hide the mouse
     Mouse.hide();
    };
    // loop code
    _root.onEnterFrame = function() {
     //put cross hairs to mouse coords
     _root.gun._x = _root._xmouse;
     _root.gun._y = _root._ymouse;
    };
    
    
  8. Hit keys Control + Enter to test the movie. The gunshights should follow the mouse. and when you click the mouse, your gunshot sound should play.

Make the bullet holes


  1. Create a new layer and draw a 20 pixel circle.
  2. Select it and hit key F8 , create a new MovieClip, call it "bullet".
  3. Name it "bull" in the instanceName textbox.
  4. With the bullet hole movieclip selected, write this code in the Actions Window:

  5. onClipEvent(load){
     this._x = _root._xmouse;
     this._y = _root._ymouse;
    }
    
  6. It should say "Actions - Movie Clip" at the top of the Actions window and not "Actions - Frame".
  7. Now select The "code" layer and rewrite the code to this:

  8. var i;
    // gunfire sounds
    var gunfire = new Sound();
    gunfire.attachSound("gunfire");
    _root.hit1.onPress = function() {
     gunfire.start();
     i++;
     //  create bullet holes
     _root.bull.duplicateMovieClip("bulletNew", i);
     if (i == 10) {
      i = 0;
     }
     
    };
    // initialise stuff
    _root.onLoad = function() {
     // hide the mouse
     Mouse.hide();
    };
    //loop
    _root.onEnterFrame = function() {
     //put cross hairs to mouse coords
     _root.gun._x = _root._xmouse;
     _root.gun._y = _root._ymouse;
      
    };
    

Make the Target MovieClip


  1. Make a new layer and call it target.
  2. On it , draw some sort of target. I just made a square 50x50.
  3. Select it and create a Movieclip, call it target_mc in the InstanceName textbox.

Make the explosion for the game


  1. In the library , double clik on the gunsight movieclip.
  2. Select the first frame and hit key F6 to create another keyframe on frame 2.
  3. Delete the contents on frame 2 and draw some sort of explosion. Just a red splash should do.
  4. Create another layer ,
  5. make a keyframe on frame 1 and
  6. put this code in :

  7. stop();
     
Now lets finish off the coding for the hitTest on the target and the moving of the target. For now , we will just move it across the screen.
Go back to the main timeline and select the code layer and delete what was in there and put this in:

var i;
// gunfire sounds
var gunfire = new Sound();
gunfire.attachSound("gunfire");
_root.hit1.onPress = function() {
 gunfire.start();
 i++;
 // make bullet holes 
 _root.bull.duplicateMovieClip("bulletNew", i);
 if (i == 10) {
  i = 0;
 }
 // hit test on target
 if (_root.target_mc.hitTest(_root._xmouse, _root._ymouse, false)) {
  // play explosion
  _root.gun.gotoAndPlay(2);
  // send target off stage
  _root.target_mc._x = 0;
  _root.target_mc._y = random(400);
 }
};
// initialise stuff
_root.onLoad = function() {
 // hide the mouse
 Mouse.hide();
};
//loop
_root.onEnterFrame = function() {
 //put cross hairs to mouse coords
 _root.gun._x = _root._xmouse;
 _root.gun._y = _root._ymouse;
 // target move
 _root.target_mc._x += 10;
 // if it goes offstage, send it stage left
 if (_root.target_mc._x<0 || _root.target_mc._x>Stage.width) {
  _root.target_mc._x = 0;
  _root.target_mc._y = random(400);
 }
};

It is a pretty lame movie but it shows you the basics of a first person shooter game in Flash MX. Next tutorial, we will refine it a lot more and make a real game. So have a good think about it and experiment with it by yourselves in the meantime. Create some targets and make them pop up here and there. Experiment with a scoring system and think about adding further levels. Do it yourself and impress us all with your efforts.

Game Resources

Flash MX2004 tutorials
"Flash MX Bible" by Robert Reinhardt
Download the file here

source www.video-animation.com/flash_32.shtml

Tuesday, October 27, 2009

Programming java applet games part 5 - Java 2d Graphics and Graphics2D class

After some days without any updated finally i have found some time to continue my tutorials. The next part is about the Java and 2d graphics. Here i will represent  the Java classes that you will need to implement the Asteroids java applet. First of all i must present you the Graphics2D class. Graphics2D extends the base class Graphics and provide methods to render enhanced graphics. So if this Graphics2D is so strong why it has not replace the standard Graphics class? The answer is simple; it is just for compatibility reasons with the Java 1.1 and previous version that use the standard Graphics class. So if you use this class for your games then they will run only on browsers that support versions of Java greater than 1.1.
Now lets see the first code snippet
public void paint(Graphics g) {
      Graphics2D g2d = (Graphics2D)g;  // make a reference
}
as you can see we just make a Graphics2D reference on the standard Graphics object that jvm passes automatically to paint method. The features that Graphics2D provides are Colors patterns like gradient fills, fill patterns from images, transparency, local fonts access, new Pen styles, 2d affine transformations.
Java provides classes that represent 2d Objects like triangles, ellipses, polygons etc. For out game everything will be represented by this games. The player object will be represented by a triangle, asteroids will be polygons, bullets will be lines. So we will use the classes that Java already implemented for us.

The first class that we will see is the Polygon. You can find full documentation about the class here http://java.sun.com/j2se/1.4.2/docs/api/java/awt/Polygon.html. When you want to create a polygon you just define a Polygon variable and the add points into it.  
Polygon p = new Polygon();
for( int i = 0; i < NUM_OF_POINTS ; i ++ ) {
    p.addPoint( x[i], y[i] );
}

at this snippet of code i assume that there are two arrays x,y that contains the polygon coordinates and a NUM_OF_POINTS int variable with the size of these arrays. To draw this polygon just code
g.draw( p );
or
g.fill( p );
The first one will draw only the outer lines of the polygon will the second will draw a polygons and the inside area.
Ok, for the rendering phase of out game we can use the Polygon class to draw triangle for the user spaceship, polygons for the asteroids and lines for the bullets. What we can do for the update position of our objects?
Java provides classes that implements affine transformations . Τhese transformations are  translate, rotation, scaling, and shearing. With combinations of these transformations we will implement the object movements on the screen. The meanings of translation is to move polygon points to certain coordinates , the  rotations rotates the points , and scaling change the size of the objects. Shearing stretches unevenly the points and will be not used for our game. When we want to move an object make translate transformations onto Graphics2D object and then make the draw for example
g.translate(15.0, 32.0);
g.draw( p );
Thats it for now, play with these classes and in the next tutorial (i hope that it will be soon) i will use these classes into Asteroids game to draw objects and move them.

As allways have nice coding time :-)

Thursday, October 8, 2009

Play Homebrew applications on Nintendo DSi

For those who do not know what homebrew applications are and they have never used one i must say that they have not seen what a DSI can do. DSI is a magnificent computational machine with many capabilities and must not be limited to licensed games for this console. Nintendo DS Homebrew applications are free software that has been created by independent developers and has not the Nintendo lisence. You can find applications such as these by a simple google search Nintendo DSi homebrew applications. There are thousands of games, with commercial quality that can be downloaded absolutely free. but there are mp3/4 players, internet browsers and many more application  All you need is a flash card and the proper DSI rom. The ligal purpose of these mod cards are to play Hombrew applications but thay can play and lisenced backup roms that can be downloaded from the web. Of course this is completely illegal.
There are many mods i know theEZ FLash Vi, M3i Zero, AceKard 2i, R4I Gold and others. I have the AceKard 2i and the steps that you must do to play homebrew are.


Format a MicroSD card with the the formatter that you can find at http://gbatemp.net/index.php?download=4003
Get the latest version of the AKAIO software from http://gbatemp.net/index.php?download=5069 and put the _aio folder with the akmenu4.nds in the root directory of the MicroSD card
Extract the ak2loader.nds into _aio/loaders
Insert the MicroSD card into your Acekard
Insert the Acekard in your DSi
And play

There is and a video guide on youtube about this